About Me

My photo
I think every meal (yes, every meal!) can and should incorporate some kind of fruit or vegetable. This is a blog that will show you how. I'm a Health Advisor by trade, which means I help people find easy, realistic ways to tweak their eating and exercise habits to maximise their health and well-being. I firmly beleive being healthy is not about dieting, skipping meals, cutting out food groups or exercising until you can't see straight. All you need is to move more, and vegetate your plate!

Monday 13 October 2014

Courgette Bread

Bread in captivity.


I have a new favourite brunch cafe in London. It's called Lantana, and they do the most amazing eggs with generous heapings of avocado, sides of spinach, amazing cornbread and a truly lovely coffee.

What they also do and I totally love is courgette bread. Apart from having a lightly speckling of green throughout the bread, you wouldn't know there was a cheeky vegetable hiding in there. Of course, being the courgette lover that I am, I had to have a go at making it for myself.

This is the recipe from their book, with a few adaptations. Frankly I could make a few more tweaks to make it more healthy, but lets consider this version 1. Courgette bread 2.0 will no doubt follow at some point!


What You'll Need
Makes 1 loaf

- 2 courgettes/zucchini 
- 2 1/2 cups self-raising flour
- 1 teaspoon baking powder
- 1/2 teaspoon salt
- 1 1/2 cups mature cheddar
- 50g butter
- 4 eggs
- 1/2 cup milk

The How-To:

- Preheat oven to 180 celcius
- Grate the courgette and squeeze it to get as much water out as you can
- In a large bowl combine courgette, flour (sifted), baking powder, salt and almost all the cheese
- In a small pan, melt the butter, then remove from heat and add in milk and eggs (whisked with a fork)
- Pour liquids into the mixing bowl and stir gently until all combined and not a minute longer. Do NOT overstir or else you'll end up with jawache trying to chew this bad boy!!
- Pop into a silicon loaf tin or regular tin lined with baking paper
- Sprinkle the remaining cheese over the top
- Cook for 60-80 minutes, until golden brown and a skewer inserted into the middle comes out clean
- Cool on a wire rack until completely cool before attempting to cut

Sunday 12 October 2014

Winter Warmer: Lentil, Carrot and Chorizo Soup

What did the chef say when the first course was ready?

Soups-on!

(I know, I'm hilarious).

For those of us in the Northern Hemisphere, the clocks are about to turn back and the nights are definitely turning in. At this turn of the season, nothing gets you into the winter vibe more than a steaming bowl of hearty soup with a nice chunk of rustic bread.

This soup is incredibly filling - the lentils are high in fibre and protein (hi fibre! hi protein!) to keep you going as the rain and sleet and snow sets in, the chorizo helps give a hearty depth to the flavour, whilst the carrots add vibrant colour (and who knows, with all that Vitamin A they contain, might help you see better at 3.30pm when it gets dark!).

Added bonus - eaaaaaasy and mega cheap to make in bulk! Freezes excellently and only gets better with age, so bake with the biggest saucepan you have and soup-er size your cooking!


What You'll Need:
Serves ~10

- 1/2 stick chorizo (or use 4 rashers of bacon)
- 6 carrots
- 5 cloves garlic
- 1 tablespoon turmeric
- 1-2 stock cubes (any flavour, but probably veggie is best)
- 2 cups red lentils
- 2.5 litres boiling water
- Black pepper to garnish

The How-To:

1. In a pan, cook the chorizo over a low heat for a few minutes
2. Remove most of the chorizo from the pan, turn up the heat and cook the rest until crispy. Set aside and turn down heat again. 
3. Grate/finely chop 6 carrots and add to pan with garlic (peeled but whole) and turmeric
4. Boil 2.5 litres of water and mix in a separate bowl with the stock cubes
5. Put stock, 2 cups of red lentils and carrot mix into large saucepan or slow cooker
6. Cook on highish (NOT boiling) for 20-30 mins, then turn down low for as long as poss (in a saucepan, as many hours as you can, ideally more than 2, or if using a slow cooker just leave it on low all night!)
7. Ladle out a generous bowlful, garnish with crispy chorizo pieces and black pepper, and a side of courgette bread!

Travel Tip: Want to take soup to work but worried about spillage? Fill up an old sauce jar with soup and whack in the freezer. Take the frozen soup to work, and leave on the side to defrost until lunchtime when you can pop into a bowl and heat. No spills, no tears!

Tuesday 7 October 2014

Healthy Spring Rolls: Be-Leaf it or Not

This 'recipe' was borne of a nearly-empty fridge. My poor shelf hadn't been stocked in a bit too long, and all that was to be found was half a head of iceberg, a handful of carrots, a bit of chorizo and a lone courgette. It was cold out, and I'd come home from a startlingly wild game of netball absolutely ravenous. So what on earth to make from my odd little collection of ingredients?


Spring rolls! Except without rice paper. And without being rolls. Whatever they are, they're a fantastically easy to make dinner that is jam packed full of colour, veg and crunch. Feel free to chop and change for different vegetables, or chicken/beef/beans in place of chorizo.

Be-leaf me, you'll want to try these. 


What You'll Need
Per Person

- 1 courgette
- 2 carrots
- 5cm of chorizo
- 1/4 head of lettuce

The How-To:

1. Chop chorizo into small pieces and pop into a frying pan over a low heat with a little oil for about 5 minutes until warmed through
2. In the meantime, wash and chop the carrots into pieces the same size as the chorizo, and add in to the pan
3. Use a julienne peeler to create 'courgetti' (or just chop into small pieces if no peeler to hand), and add in with the carrots/chorizo
5. Stir everything for 3-4 minutes until warmed through
6. Tear away each iceberg leaf individually and give a quick rinse
7. Scoop a generous amount of courgette/carrot/chorizo mix onto each leaf
8. Eat immediately!


Sunday 28 September 2014

Healthy Pizza Bites


Healthy bite-sized pizza bites that you can whip up in minutes. 

To get around the calorie-punch that normal pizza gives, try using courgette slices for a healthier alternative to the base. High in fibre and water, and lower in carbohydrate and salt, it's a super easy way to vegetate your pizza plate. 

Additional Tip: Use a strong cheese such as feta instead of cheddar so you don't need to use so much. 

Mini Courgette Pizza Bites
Makes 12-15 bites

What You'll Need:
1 courgette/zucchini
1/2 jar tomato pasta sauce
1/2 onion
1/2 a pepper/capsicum (colour of your choice)
50g feta cheese
1 chicken breast (optional)

The How-To:

1. Slice the onion and cook over a low heat until transparent (~5 min)
2. Chop the chicken (if using) into small cubes and add in with the onion
3. When the chicken is cooked, pour the tomato sauce over the stir through, and remove from heat. 
4. Slice courgette into discs about 1/2cm thick
5. Scoop a heaped teaspoon of onion/chicken/tomato mix onto each slice of courgette
6. Add a small piece of pepper/capsicum on top 
7. Top with a small piece of feta
8. Place on a baking tray and grill until warmed through and cheese turns golden brown (feta will not melt much).
9. Enjoy!

Note: Be sure to let cool for at least 5 mins before eating as they can get very hot!

Saturday 27 September 2014

Are Avocados Healthy?


I've recently travelled to the amazing country of Peru. Apart from fascinating Inca ruins, great weather and lovely people, it also had some seriously yummy foods. Case in point: the avocado. Whilst trekking up to the breathtaking (get it, get it) city of Machu Picchu, stopping for lunch by the ruins of WiƱya Wayna pictured above, our guide informed us that the Peruvians simply peel an avocado and eat it whole. So that is exactly what we did!

But the question always remains - are avocados healthy?

It can be a little confusing, as avocados are high in fat. Yet, they are considered healthy. Why is this?

The simply answer is that they contain mostly the good kind of fat, called unsaturated fat. This kind of fat helps to increase your levels of protective HDL 'good' cholesterol, which assists in lowering levels of LDL 'bad' cholesterol, in turn decreasing your risk of heart disease. Simples?

The only consideration is that even though they are full of 'good fats', they are also calorie-heavy, so should be eaten in moderation, particularly if following a calorie controlled diet. Best option? Replace unhealthy 'bad fats' such as butter with avocado and you'll be right as rain!

Simple Ways to Use Avocados:

- On toast/in sandwiches instead of butter
- Use to whip up a surprisingly delicious chocolate mousse
- Atop a yummy crunchy salad
- In a green smoothie to make it velvety smooth and luxuriously glossy
- Alongside a yummy weekend brunch
- Homemade guacamole
- In, up and around any Mexican fare - tacos, fajitas, enchiladas etc

As an old TV slogan in the 90's encouraged us - "go on, 'ave an avo"

Tuesday 22 July 2014

How to Make Salad Filling: The Secret


When you think of salad, "filling" isn't often the first adjective that springs to mind. More likely you'll think "light lunch", "healthy" or "that green stuff on the side of my burger".

But let me tell you, the secret to making a salad that satisfies in the curious 'I am so full yet don't feel stuffed' way that heavier meals never will is so simple. 

Protein

But why? Protein is a more complex nutrient than carbohydrate (what your salad-y greens are made of) and takes longer to be broken down to used as energy. So therefore, you feel full. For longer. It's no more complicated than that. 

Exactly what protein you choose to have in your salads is entirely up to you, however it's a great opportunity to have some oily fish (mackerel, herring, sardines, kipper, fresh tuna) which make your good cholesterol sing and your bad cholesterol say adios. 

The best part is you can chop and change proteins (different varieties of fish, egg, chicken, lean red meat, tofu, pulses, beans...) and end up with an entirely different bowl of salad awesomeness every single day. 

My Favourite Favourite Simple 'desert island' Salad: tuna and boiled egg. 

What You'll Need:

- A generous bowlful of mixed salad leaves
- 1 carrot
- 1 small-medium courgette/zucchini
- 1 small tin tuna in either sunflower oil or brine*
- 1 boiled egg

The How-To:

1. Salad greens into bowl
2. Grate carrot and courgette and put over the top
3. Peel egg and roughly chop and add on top
4. Open tin of tuna and drizzle oil/brine over the salad, then add the tuna meat on top
5. Gently mix together and eat immediately

* tuna in sunflower oil is less healthy than in brine. However as it is used as the dressing and there is no more adding of oil I feel that I can get away with the 'guilty pleasure'. If you'd rather use brine or drain the tuna entirely, go right ahead. 

Tuesday 24 June 2014

Great Eggspectations: Easy Breakfast on the Go


The age-old debate: sleep vs. breakfast. If you're anything like me, getting up even 2.5 minutes earlier than you have to on a work day is not an appealing thought. Much as I love food, I also love sleeping! I don't doubt many of you are the same. So what do you do - sleep in and miss breakfast, or scrape yourself out of bed early and munch your way into the day?

As ever, I'd suggest taking the middle ground. Boil up a little batch of eggs at the start of the week, then as you head out the door in the morning, take one or two with you and peel and eat en route to the tube/bus/bike/car/pogo stick. It takes no more than a minute to eat, and is a great little pocket of protein (an essential part of any breakfast as it keeps you full much longer than carbohydrate-based breakkies like toast).

If you're horrified by the thought of only eating a boiled egg for breakfast, rest assured, there is more. The egg is simply an amuse-bouche (if you will) before geting to work/school and having breakfast: the sequel.

If you're not an egg fan (I know many are not), you can always substitute with a banana pancake, a handful of nuts, or a piece of fruit. The idea is that you at least have something to kick-start your metabolism and get you revved up for the day.

What do you like to eat for breakfast?


Sunday 22 June 2014

After-Dinner Mint: Peppermint Tea


Mint tea is the perfect way to end a meal. As a natural digestion aid, it will help you through any potential "do-I-need-to-loosen-my-belt-a-notch" phases and help you towards a better nights sleep. 

Simply pop a few leaves of fresh mint in a mug of boiling water, and voila - instant after-dinner zen!

Tuesday 17 June 2014

Mex-Uccini: Healthier Tacos


Today we're going south of the border and vegetating our plates Mexican style. 

Using a hollowed our zucchini (courgette for the English folk, calabacĆ­n for the Spanish-speaking vegetators) instead of a traditional wrap or taco lightens the carbohydrate load and adds a great splash of colour to your dinner fiesta. 

No more broken-taco-shell tears. 

What You'll Need:
Per Person

1 zucchini
1/2 onion
Handful each of red, yellow and green peppers
1-2 cloves garlic 
1/3 jar pasta sauce/passata
1/3 can kidney beans, drained
100g low fat cheese eg quark/cottage cheese
Fajita spice - to taste


The How-To:

- Pre-heat oven to 180c
- Gently cook onions in a frying pan over a low heat until see through
- Add finely diced garlic and peppers (cut into strips) and fajita spice
- After a few minutes, add kidney beans and passata, and keep on the heat until warmed through
- While the above is getting saucy in the pan, slice the zucchini in half lengthways, and use a teaspoon to scoop out the squishy insides. Add these to the frying pan. 
- Pop the zucchini halves (henceforth known as your 'taco shells') in the oven for 5 minutes to warm through
- Remove from oven, and spread a layer of the cheese at the bottom of the 'taco shell'
- Add a layer of frying pan mix and serve immediately. 


For best effects, consume whilst wearing a sombrero and if at all possible, a novelty moustache. 

Buen Provecho!

Tuesday 10 June 2014

Pine-ing for Veg: Stir Fry with Pine Nuts, Tuna and Boiled Egg


Stir-fry. Quite possibly the easiest way to get a trailer-load of veg in your face. A great meal for a summers evening to leave you feeling full but not heavy (nobody wants to sink in the swimming pool).

Topped with tuna (or other fish of choice), a boiled egg and some roasted pine nuts to add protein and crunch. 

What You'll Need:
Per Person

- Half a packet stir fry veg (easily bought in veggie section of all supermarkets for circa £1)
- 1 small tin of tuna in sunflower oil
- 1 hard boiled egg
- A tablespoon of pine nuts 

The How-To:

1. Place the pine nuts in a wok or frying pan over a low heat WITHOUT any oil, until lightly bronzed
2. Remove from pan and set aside
3. Add a dash of oil to the pan (you can use the oil from the tuna here if you fancy) and turn up the heat
4. Pop the veg mix in and stir continuously for ~4.5 minutes (my method: put iPod on. Stir for more than one song but less than two).
5. Take off the heat and transfer to serving dish. 
6. Pop tuna, boiled egg (roughly cut up) and pine nuts on top. 

Tip: packs up brilliantly for a crunchy veggie-filled leftovers. Make double and take it to work for lunchtime yumminess!

Thursday 5 June 2014

Choc-oconut and Banana Popsicles

Coconut, chocolate and banana are having a party. You're invited. 


A cute, yummy and ridiculously easy way to vegetate your summer afternoons!

What You'll Need:
Makes 4

1 banana
200ml chocolate-flavoured coconut milk
2 good pinches dessicated coconut

The How-To:

Blend banana and choc-oconut milk.
Stir through coconut
Pour into popsicle moulds
Leave in freezer for >2 hours
Slurp.

Sunday 25 May 2014

Run Banana Run


Don't be fooled by so-called healthy pre- and post-exercise snacks. Most of them are gimmicky and loaded with sugar that most likely you haven't burned doing your event (marathon runners and iron men and women....you are excused). 

The easy answer - grab a banana. Sorted. 

What You'll Need:

A banana 
Trainers
The need for speed

The How-To:

1. Attach trainers to feet.
2. Start Running.
3. Keep running.
4. Keep running.
5. Run a little more.
6. Almost there. 
7. Really nearly almost there..
8. Stop running. 
9. Peel banana and put in face. 
10. Sorted. 

Saturday 24 May 2014

Raspberries: Nom


Raspberries - little cancer-fighting nuggets of awesomeness. A perfect treat for a warm summers afternoon. 

What You'll Need:
Per Person

1/2 cup raspberries (fresh or frozen)
1 cup Greek yoghurt
A good drizzle of honey or agave nectar

To up the anti: Flaxseed to sprinkle on top (about 1 tablespoon), a handful of mixed nuts/seeds, more fruit!

The How-To:

1. Pop Greek yoghurt in a bowl
2. Gently mix through the raspberries
3. Drizzle with honey/agave nectar
4. Nom. 

Friday 23 May 2014

All Aboard the Blender Bus


Carrot, Apple and Ginger Smoothie: "The Zinger"


A wee shout out to the Breville Blend Active blender - the perfect 'introductory' blender for those wanting to dip their toes in the green smoothie pool, rather than splashing out circa £500 on a Vitamix (a very good, but very high-end blending wizard).

It costs around £25 (buy from Amazon here) and blends carrots (see recipe below), raw oats, frozen berries, beans...


At the risk of sounding like an ad, it is an absolute dream. All aboard the blender bus...!


Carrot, Apple and Ginger Smoothie: "The Zinger"

Pictured

What You'll Need
Serves 1

2 large carrots, roughly chopped

1 gala apple
1cm knob of ginger, peeled


The How-To:

- Pop the carrot and ginger into the blender.
- Add in enough water so that it fills up approx 1/3 to 1/2 full.
- Blend for about 1 minute.
- Add in the apple and blend a further 1 minute.
- For best effects, drink immediately.


Thursday 22 May 2014

White Rice Who? Introducing Cauliflower Rice

White rice. A staple food in so many places, but at the end of the day, not the best thing for you. Often used in stir fry, sushi and curries with reckless abandon, these innocuous little white grains seem to sneak in everywhere. It's cheap, easy and readily available yes, but unfortunately, this little devil isn't as innocent as it seems. This is where cauliflower comes in.

Gram for gram, cauliflower contains a fifth of the calories (23kcal/100g, as opposed to 130kcal/100g), has double the "fullness factor", six times the dietary fibre, and has 74% of your daily vitamin C requirements to banish away pesky winter sniffles (white rice, needless to say, has 0%).

Need more convinving? The 'amino acid score' of a food indicates how 'good' a protein it is - that is, how many of the nine essential amino acids it contains, and in what ratio. An amino acid score of more than 100 indicates a good quality or complete protein. Rice has an amino acid score of 71. Cauliflower? 102.

I could go on (a good source of Thiamin, Riboflavin, Phosphorus and Potassium, and a very good source of Dietary Fibre, Vitamin C, Vitamin K, Vitamin B6, Folate, Pantothenic Acid and Manganese anyone?) but what you really need to know is what do do with this magical ingredient.


Cauliflower Rice - The How-To:


1. Whack your cauliflower in a blender and lightly pulse (don't over mix or you'll end up with purƩe. Great for baby food, less so for faux-rice).
2.  Add a good shake of turmeric to give an interesting flavour and colour (also high in vitamin C and magnesium, and a very good source of Dietary Fiber, Vitamin B6, Iron, Potassium and Manganese - what a coincidence!)
3. Microwave on high for 1-2 minutes until cooked but still a bit crunchy
3. Voila!

It really is that simple. Such a snap to make compared to boiling rice for years.


Sources:
White rice nutrition: here
Cauliflower nutrition:here
Cauliflower image: here

Thursday 15 May 2014

Doctor Peppers


A pepper a day keeps the scurvy away!

Peppers. Bell peppers. Capsicum. Whatever you choose to call them, these little beauties are a one-way ticket to a healthier you. 

One of these rainbow beauts, be it green, red or yellow, has more than three hundred times your daily vitamin C needs. And that my friends is good for your immune system (what winter sniffles?), fast wound healing (sayonara papercuts), increases absorption of iron (giving you more energy) and is a powerful antioxidant (a cancer-fighting superhero).

But forget all that jazz. Just know that peppers are damn good for you and make any dish look like a Mexican fiesta! OlƩ!

Mixed Peppers with Tuna and Pine Nuts (pictured).
Serves Two

What You'll Need
A rainbow of peppers - one red, one yellow, one green
1 onion (white or red- your call)
3 cloves garlic
1 large tin tuna
Handful pine nuts
Dash olive oil
Salt, pepper and crushed chilies to season

The How-To:
1. Add pine nuts to a frying pan over a low heat and toast gently for 3-4 mins until lightly golden
2. In the meantime, finely chop onion and garlic
3. Remove pine nuts from pan and set aside
4. Add olive oil to the pan, and the onion and garlic, and salt, pepper and chili flakes
5. Leave to gently sweat (~5 min) whilst chopping peppers into bite-sized chunks
5. Add peppers to pan and turn up heat
6. After ~5 minutes, add tuna and stir through for 1-2 minutes to warm through. 
7. Remove from heat, pop in a bowl and top with pine nuts. 
8. Optional: wear sombrero whilst consuming


Easy Chick-Peasy Cookies


Cookies made from chickpeas. Yes - it is a thing and no, you won't taste them!


These cookies are gooey, golden, scrummy and won't turn you into a grouchy Cookie Monster from the inevitable post-consumption sugar low.

But why would you want chickpeas anywhere near your cookie jar?

Good question.

To keep it short and sweet, chickpeas (known as garbanzos in the States) give slow-release energy (huzzah!), are high in fibre (brilliant!), contain lots of protein (superb!) and are high in iron (fantastic!).

Basically, you want them in your life.


What You'll Need
Makes 6-8 cookies

Dry Ingredients

1/3 cup cookied chickpeas (drained and rinsed)
2/3 cup porridge oats
1/3 cup dessicated coconut
1/4 teaspoon salt
3/4 tsp baking powder
1/4 teaspoon baking soda
1/2 cup brown sugar
1/4 cup flaxseeds

Wet Ingredients

1 tablespoon greek yoghurt
1/3 cup milk (any)
2 tsp vanilla extract

Optional Extras to Mix Through
Dried fruit (raisins, cranberries, sultanas, dates etc)
Choc chips

The How-To

1. Preheat oven to 180c, and line a cooling rack with baking paper
2. In a blender mix all dry ingredients, leaving 1/3 cup of porridge oats out.
3. Transfer to a mixing bowl and combine with all wet ingredients
4. Mix in remaining porridge oats and any additional extras desired
(Note: here ideally leave mixture to sit for 10 mins to allow oats to absorb moisture from the mixture. But not a mandatory step)
5. Scoop into cookie-shaped balls ontothe baking paper, leaving at least 3cm between each as they will spread out while cooking.
6. Cook for ~18 minutes (until lightly bronzed)
7. Take out of oven, take the bisuits off the baking paper and put back onto the cooling rack.
8. Put back in the oven for a further 6 minutes (this should stop the bottoms being too sticky)
9. Leave to cool before eating.

Easy, breezy, chick-peasy. 

Tuesday 6 May 2014

Quarter-Hour Cookies: Oat, Coconut and Dates


Cookie hankering? Got 15 minutes to spare? Perfect. 

Oats, dessicated coconut, milk, dates. No flour, no eggs, no butter. Let's face it, they're practically porridge!

Oats for slow release energy instead of instant-energy-rapid-energy-slump plain flour, and dates for chunks of sweetness that contribute to your 5-a-day. 

These little beauties pack up nicely in your lunchbox for a cheeky mid-afternoon pick-me-up!

(Original recipe modified from www.chocolatecoveredkatie.com)

What You'll Need:
Makes 6 cookies

3/4 cup oats
2 heaped tablespoons dessicated coconut
2 tablespoons brown sugar
1/2 teaspoon baking powder
Handful chopped dried dates
1 tablespoon oil
3 tablespoons milk
1/2 teaspoon salt

The How-To:

1. Blend oats, sugar, salt and baking powder 
2. Add into a bowl with the rest of the ingredients and mix. 
3. Place on tray lined with baking paper in cookie-shaped blobs (relatively flat)
4. Cook for 10 minutes in 180c

Options

- in place of dates, use raisins, sultanas or nuts 
- add a good pinch of cinnamon for a festive flavour hit 
- sub 1 tablespoon of maple syrup for 1 tablespoon of sugar (be sure to use less milk)
- decrease sugar, and add in mixed nuts and seeds for a more savoury flavour
- an easy recipes for young bakers: mould into fun shapes or letters of your name!

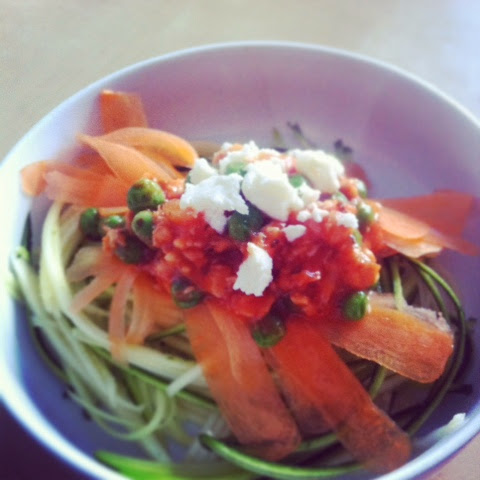
Carrotuccine: Carrot Fettuccine


Carrot-uccine. A healthy, crunchy, colourful and yummy take on fettucine. 

Why so good?

One large carrot gives a whopping two and a half times your daily recommended vitamin A intake - helping to keep your peepers sparkling and healthy and improve night vision. 

According to Wikipedia (so therefore fact, obviously), during WWII the RAF hid their advanced radar technology from axis powers by spreading rumours that their gunners' high carrot consumption had resulted in amazing night vision.

Whether or not this humble little root vegetable is really responsible for helping the allies, we do know it can help you work our way towards a healthy waistline. 

The perfect option for a warm summers evening. 

The How-To:

1. Wash carrot well
2. Use a potato peeler to cut carrot into thin strips
3. Optional: add to pasta sauce a few minutes before serving to soften a little. Or just go ahead and use raw! 

Tuesday 29 April 2014

Sushi Just Got Sexy


Sushi has always been a pretty sexy, healthy meal. With omega-3 filled salmon and avocado, cooling cucumber, zingy ginger and seaweed (a bone fide superfood) featuring as common ingredients, it's hard not to think of this as a little roll of wonder. 

Now meet sushi v2.0 - that's right, sushi has been vegetated. Because although all the ingredients listed above are super-fantastic-amaze-foods, a roll of sushi also contains a whole lotta white rice. Which I am not a fan of (see post here).

So, to vegetatemyplate this bad boy, it's just a simple swap - bulgur wheat or quinoa in lieu of rice (or both, as pictured).

So why quinoa?
The only vegetarian source of complete protein, quinoa will get you full and stay there. 

And why bulgur wheat?
It packs a much bigger fibre punch than white rice, and has a very yummy, nutty flavour. 

Let's do it. 

What You'll Need:
Makes 3 x 10cm rolls

- 3 sheets sushi nori (available in all big supermarkets)
- 1 cup bulgur wheat or quinoa
- 3 cups water
+ sushi fillings. Popular options include: avocado, cucumber, prawns, ginger, salmon...

The How-To:
- Add water to bulgur wheat/quinoa and boil hard for 10 minutes
- turn down heat and simmer for additional 5-10 mins (bulgur wheat) or 10-15 mins (quinoa) until water is absorbed and grains are not crunchy. 
- spread an even layer of the grain across a seaweed sheet, leaving a 1cm gap at the top and bottom
- make a strip of fillings in a little pile across the grains
- use a sushi mat (or hands if easier) to roll the sushi tightly. 
- pop in the fridge to 'set' (roughly 10 min)
- use a very sharp and dry knife to cut into ~2cm slices
- serve with soy sauce, ginger, wasabi and if feeling punchy, a zingy Japanese beer like asahi!

Sunday 27 April 2014

Insta-Pizza Bases


Homemade pizza base. Mega faff right? Wrong. 

My old friend Greek Yoghurt and flour come to the rescue once again by providing a super easy quick pizza base that can be knocked up and ready to eat faster than you can say pizza express. 

Not strictly a vegetatemyplate worthy candidate as does not contain any of your 5-a-day, but a great opportunity to load up the top with yummy fruit or veg like a rainbow of peppers, spinach, pineapple, mushrooms, sweetcorn, onion ... 

What You'll Need:
Makes 6x ~10cm diameter bases

1/2 cup low-fat Greek yoghurt
1 1/2 cups plain flour*
1 tsp salt
1 tsp baking powder
Toppings of choice!
*3-1 yoghurt to flour ratio. (However much Greek yoghurt used, use triple the flour)

The How-To:
1. Combine flour, baking powder and salt in a mixing bowl. 
2. Fold in yoghurt
3. Knead knead knead with floured hands for a few minutes until dough feels soft and pliable.
4. Roll dough into 6 even balls, and use a rolling pin (or in my case, a thermos as a rolling pin is something I have yet to purchase. Invention of the mother of necessity.) and roll dough balls out until about 1/2 cm thick
5. Grill in oven 5 minutes either side
6. Whilst grilling, prepare your toppings (slice up your peppers, grate cheese etc)
7. Remove from oven/grill, top with tomato-ey sauce, toppings of choice, and a sprinkling of cheese. 
8. Pop back into grill until cheese is golden brown

Top Tips
- Use wholemeal flour to make this even healthier and filling
- The dough can me fridged or frozen. Simply wrap in glad wrap (cling film) so it is airtight, then whip out of the freezer for insta-pizza! (Obviously will need to defrost a little first. But will not take long, especially if dough ball is relatively small)
- add herbs (eg oregano) to the dough to give a tasty twist
- add 1-2 cloves of finely crushed garlic for insta-garlic bread 
- use smushed avocado instead of tomato sauce for a colourful and healthy alternative

Thursday 24 April 2014

Halloumi Quinoa Salad

Quinoa, Halloumi, Courgette and Broccoli Salad


A tasty little treat perfect for a summer's day. High protein, packed with bright green veg, and super salty yummy haloumi! (Yes, I realise halloumi is one of the highest-salt cheeses out there, on occasion it's just brilliant. The mix of squishy halloumi and crunchy veg is delightful!)

Quinoa is the latest entrant on the superfood trendy list. And for good reason. It looks and feels a lot like rice, but as the only vegetarian source of complete protein, unlike rice it will keep you full for a long time, and not cause a big spike in blood sugar levels. You can buy it easily in all supermarkets.

I served this at a gathering full of people for whom quinoa is "one of those weird, healthy things". I told them it was a rice salad, and they gobbled it all up and went back for more!


What You'll Need:
For each person:
- Quinoa: 1/2 cup (uncooked)
- Brocolli 1 cup
- Courgette: 1
- Halloumi: ~ 3 playing card slices
- Salt and Pepper to season
- Olive Oil to drizzle

The How-To:

- In a pan, put the uncooked quinoa and twice as much water (eg: 1 cup quinoa, 2 cups water). (Optional: for addional flavour, pop in a veggie stock cube)
- Cut up brocolli into bite-sized pieces
- Boil quinoa hard for 10 minutes
- Put the brocolli in a steamer above the quinoa to steam merrily away as the quinoa cooks
- Turn down the heat and simmer the quinoa for an additional 10-15 until soft (try a little bit - if crunchy and difficult to chew, its not ready)
- When ready, drain quinoa, season and set aside with brocolli to cool
- Use a potato peeler to create long slices of courgette - including skin
- Slice the halloumi into playing-card sized pieces, and grill for 3-4 minutes each side, until beautifully golden brown 
-  Mix all together, season, and drizzle with olive and mix again.

Serve warm or cold. (the halloumi is definitely yummiest warm though!)

Saturday 5 April 2014

Bean Making Brownies


Chocolate Brownies. Decadent, yes. Healthy, no.  Until now. 

Don't get me wrong, these will never be classified as a superfood, they will not make you live to 127, but in comparison to their classic counterparts, these little beauties are a lot kinder to the waistline whilst tasting super gooey and amazing. 

No butter, no flour, no eggs, no oil. No worries. 

What You'll Need:

(Original recipe taken from the brilliant Chocolate Covered Katie, and adapted).

1 can black beans, drained. 
2 tablespoons cocoa powder
1/2 cup oats
1/4 teaspoon salt
1/2 cup maple syrup OR 1/3 cup agave nectar with 2 tablespoons sugar
1/4 cup Greek yoghurt
2 teaspoon vanilla essence
3/4 teaspoon baking powder
1 bar of milky bar (or other white choc)

Optional extras:

1 Mars bar for chunky decoration on top
1/3 cup Greek yoghurt to swirl through for marbled effect (as pictured)

The How-To:

1. Well mix all ingredients except the milky bar and optional extras in a blender until very smooth
2. Roughly chop the milky bar
3. Pour brownie mix into a baking tray covered with baking paper
4. Stir through milky bar until evenly spread
(Optional step: evenly dollop extra Greek yogurt on top and stir through with a spoon until batter is 'marbled')
5. Scatter mars bar on top of the mixture
6. Cook in 180 degrees for 25 minutes. Leave at least 10 minutes before trying to slice into. 

Tip: taste even better cold!